Sunday 28 July 2013

A Glut of oranges.


We have such a glut of oranges at the moment. Despite arguing with the pesky fruit fly all season, we have still managed to get a huge amount of healthy fruit.

So I had a big 'orange weekend' this weekend.


I peeled the rind off all the fruit fly affected oranges to make a citrus cleaner.  It's easy to make.  Just fill a jar with orange peel (the thinner the better as the essential oils are in the orange part of the peel, not the white part), and top up the jar with white vinegar.  The peel needs to steep in white vinegar for a couple of weeks before it's ready. When the vinegar has taken on some of the orange colour, strain off the peel and put the vinegar solution into a spray bottle.  It can be diluted 50/50 with water and used to clean as you would use a shop bought bathroom or kitchen spray cleaner.  I don't use this on wooden furniture though.  I think it could be a bit too strong for good quality wood (not that ours is!)


I also made some orange chutney with the good oranges.  I can't wait to try this.....I just love anything orange flavoured.  Especially Cointreau on the rocks!

The following recipe made these five jars above plus one more medium sized jar which is already in the fridge waiting to be sampled.

FRAN'S GENERIC CHUTNEY RECIPE

1 kilo fruit (see note)
1 onion
1 cup sugar
2 cups vinegar
1 tablespoon lemon juice
1 teaspoon salt
A handful of sultanas
Spices to suit fruit (see note)

Method:  Chop fruit and onions.  Simmer all the ingredients together until nicely thickened to a good consistency. Depending on how much liquid is in the fruit, this usually takes about an hour.  Pour into hot sterilised jars and seal.  
Note :  Any type of fruit can be used.  For this orange chutney the 1 kilo of fruit consisted of four large oranges (with peel) and one pear. The spices I used were 1 teaspoon ground cloves, 1 teaspoon ground cardamom, 2 teaspoons minced chilli and 2 teaspoons minced garlic.

Of course larger batches can be made, but I prefer to make smaller frequent batches as the extra fruit becomes available.  Then I don't end up with a great big all day episode in the kitchen.  Plus it gives me a chance to experiment with the spices and flavours.


And there's still more beautifully home grown oranges in the fruit bowl.  Checked, double checked and just perfectly ready to eat!

Tuesday 16 July 2013

Making an apron or 'pinny' from a man's shirt.

Ok people.  Close your eyes if this looks like it's going to be a bit too dorky for you.  I fully intend to get my blog into print form using 'blog2print' or something similar, at some stage.....so that when I'm old and probably demented, I'll have something interesting to read and reminisce about (that I understand).  I'll also have easy instructions to follow when I want to sew, make soap, make washing powder or maybe piece a quilt.........you get the drift.  My own little 'Funk & Wagnall'.

I also posted this tutorial on Rhonda's blog here because I'm always endeavouring to get my brain around the internet world and doing things like blogging and uploading tutorials is fabulous practise.

Ok here we go..............

How to make an apron or 'pinny' out of a man's shirt.  
(I think it's called 'repurposing').  

 Choose a shirt that has a good length and plenty of room.  
 You'll need one with long sleeves.  Don't ask why, just wait and see.  

This sturdy denim one cost me $3.50 from the op shop.  I have to buy shirts because I think (just between you and me) that I'm fatter than my husband.


Leave the shirt buttoned up and cut off the sleeves and neckline.

The rebel in me just loves to do this to a perfectly good shirt.  Yes, I do live dangerously some days.


Try on to see how the fit is and trim if it's too wide on the shoulders.


I like to use really large shirts to get the length, but that often means they are too wide across the back.


If the shirt that you have chosen is too wide, make a little pleat in the centre back. Try on for size.
You want it to be loose and roomy, but not falling off your shoulders.


When you are happy with the fit, stitch down.


Try on again (the pinny may bit a bit 'gapey' under the arms if you're using a very large shirt) and when you're completely happy, overlock or zigzag all raw edges, fold over 1/4" and stitch down.

The neckline and armholes can also be finished with bias tape, however this denim shirt was a little too bulky for that.


Now for the pockets! (I love this bit). This is where you can get really creative, depending on the shirt you have chosen. Sometimes I'll choose a shirt solely on the design of the cuff!  I found a pale green hemp shirt recently that had a retro floral print inside the cuffs.....but that was chopped up for a quilt.

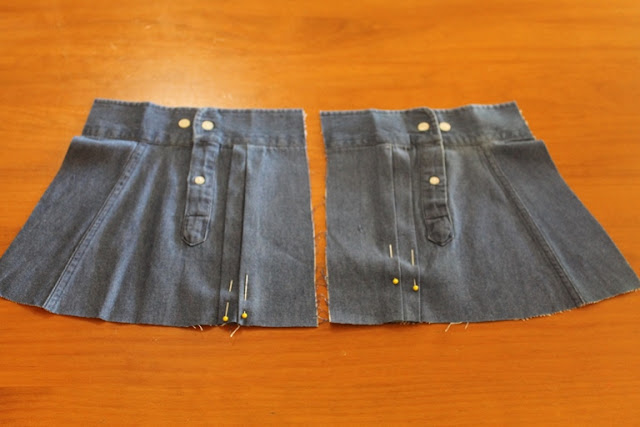
Cut off the cuffs about half way up the sleeve.


Turn the cuffs over so the buttons are facing the table and cut straight up the middle of the sleeve on the opposite side to the buttons, through one layer of fabric only.


Iron the cuffs out flat, measure and trim to desired pocket size. I like to sew corresponding pleats along the bottom of the pocket as it gives me lots of room for pegs etc or picking things up as I'm going round the house.....(and hiding the odd block of chocolate). 
This is also the time to decorate the pockets if you want to with some ricrac, braid, appliqué or maybe some embroidery.  


Fold a narrow edge over on pockets and attach to front of apron/pinny.  (I must have been in the midst of a 'sewing frenzy' at this point because I forgot to take a pic).

And here it is finished!


And modelled (ha ha!)


This idea can be adapted in countless ways. It can also be worn with the buttons down the back and the pleat at the front as a maternity smock - remove the chest pocket or you'll end up with a pocket on your shoulder blade.

I really love this apron/pinny idea made in white linen - (if you're ever lucky enough to find a pre-loved luscious white linen shirt), with some embroidery added around the neckline and on the pockets. 

I hope you take this idea and make it your own.
"I dreamed a thousand paths. I woke and walked my own".......Chines Proverb.

Tuesday 9 July 2013

A retro caftan for Summer

Ok.

Here's my latest project.


Stop laughing.  I think it's funky and fun.  Especially the fabric.  It's by Prints Charming, a small Australian owned fabric design company.  You can read more about them here.
The caftan pattern is also by an Aussie company called Make it Perfect.  Check them out here.


In progress.......


......and Voila!  Another fab creation laying on the floor because I have no models!
I'm certainly not going to put my bathers on underneath a caftan at this time of the year and attempt to photograph myself in the mirror.  Believe me, it looks better on the floor.